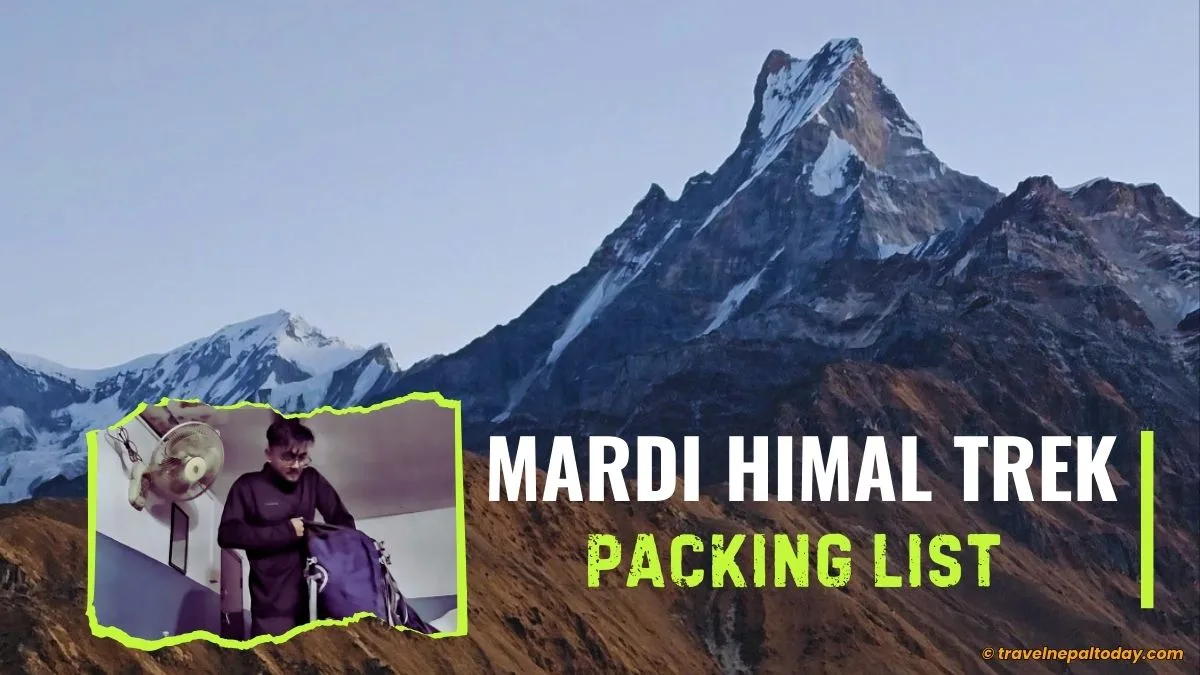
Packing list for Mardi Himal Trek can feel confusing, especially if it’s your first time trekking in Nepal. Many trekkers worry about whether they’re carrying too much or too little. And honestly, both situations can cause problems on the trail.
By the end of this guide, you should have a clear idea of what to pack, what to skip, and how to pack smart for the Mardi Himal Trek.
Because when your backpack is balanced properly, trekking simply becomes more enjoyable.
And trust me, when you’re climbing uphill for hours, every extra gram suddenly feels much heavier than it should. So let’s make sure that doesn’t happen to you!
During my Mardi Himal Trek, I made a few packing mistakes myself. Nothing too serious, but there were definitely items I carried that I didn’t use at all. At the same time, there were a few things I wish I had packed. So I’ll be sharing those lessons as well.
Factors Affecting Mardi Himal Trek Packing
There are multiple factors that come into play. Let me explain them one by one:
No. of Trekking Days
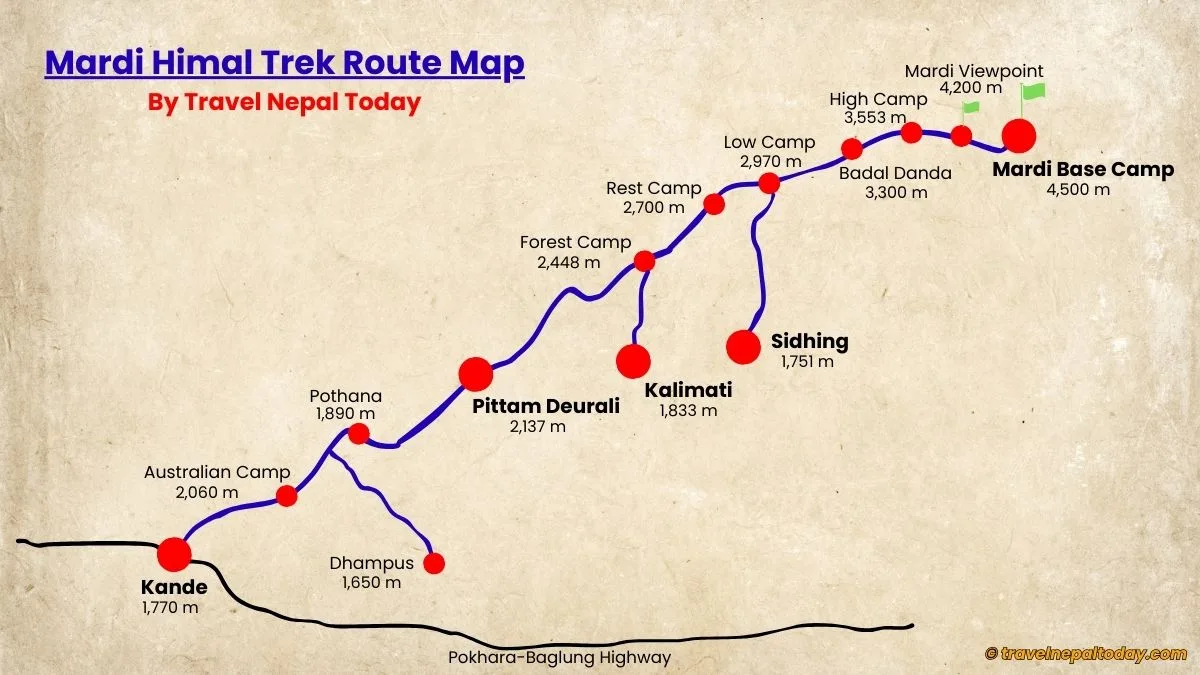
The ideal duration for the Mardi Himal Trek usually ranges between 5 to 7 days, which depends on where you begin your trek. Some choose to start from Kande or Dhampus, while others begin from Pittam Deurali.
Your starting point naturally affects how many days you’ll be trekking and how much you should pack.
Your Final Destination
Another factor is how far you plan to go.
Some only hike up to High Camp, which already offers incredible views of Machhapuchhre and the surrounding mountains. Others push further to reach Mardi Himal Base Camp or at least to the Mardi Viewpoint for sunrise early in the morning.
Your plan matters here:
- If you’re waking up at 3 AM for the sunrise hike, you’ll need extra layers and proper lighting equipment.
- But if you’re simply hiking during the daytime and returning by afternoon, your packing might look slightly different.
Season and Weather
Then comes the season you’re travelling in.
Weather in the mountains changes quickly. What you pack for spring or autumn can be very different from what you’ll need during winter or monsoon. Clothing layers especially need to be adjusted based on the current season.
Even if the trail is short, you should still prepare properly. Some trekking equipment is essential in every season, no matter when you go.
Items like a good backpack, water bottle, power bank, and proper trekking shoes remain non-negotiable.
Your Health Condition
Your health condition is another important factor.
Some trekkers may need to carry specific medications or personal health items depending on their body’s needs.
It’s always better to be prepared rather than search for medicine in the middle of the mountains.
Mardi Himal Trek Packing Checklist
Here’s a table that should give you a clear idea of what’s necessary and what’s optional for the Mardi Himal Trek. In case you fear losing this page, just bookmark and you can always come back later.
One thing I always suggest is pack light but pack smart. You don’t want to miss essential items, but at the same time, carrying unnecessary weight will only slow you down on the trail.
To make things easier, I’ve also included recommended quantities and seasonal notes wherever needed. So before you close your backpack, just go through this checklist once:
Mardi Himal Trek Packing Checklist (Quick Summary)
| Category | Item | Recommended Quantity | Season Notes | Important Notes |
| Backpack & Bags | Trekking Backpack (30–40L) | 1 | All seasons | Comfortable straps and rain cover recommended |
| Daypack (if porter is carrying main bag) | 1 | All seasons | Useful for water, camera, snacks | |
| Dry bags / packing cubes | 2–3 | All seasons | Keeps clothes organized and dry | |
| Clothing | Moisture-wicking T-shirts | 2–3 | All seasons | Avoid cotton if possible |
| Thermal base layers | 1 set | Autumn / Winter / Early Spring | Essential for cold mornings | |
| Fleece jacket | 1 | All seasons | Good mid-layer | |
| Down jacket | 1 | Winter / Cold seasons | Very useful above Low Camp | |
| Trekking pants | 2 | All seasons | Lightweight and quick-drying | |
| Waterproof jacket | 1 | Monsoon / Spring | Wind protection as well | |
| Gloves | 1 pair | Winter / Cold mornings | Needed for sunrise hike | |
| Warm hat / beanie | 1 | All seasons | Especially for High Camp | |
| Sun hat / cap | 1 | Spring / Autumn | Protects from strong sun | |
| Footwear | Trekking boots | 1 pair | All seasons | Must be well broken-in |
| Extra socks | 3–4 pairs | All seasons | Wool socks recommended | |
| Camp sandals | 1 pair | Optional | Useful at lodges | |
| Gear | Trekking poles | 1 pair | Optional but recommended | Helpful on steep sections |
| Headlamp / flashlight | 1 | All seasons | Important for sunrise hike | |
| Power bank | 1 | All seasons | Charging is limited on the trail | |
| Water bottles | 1–2 | All seasons | Reusable bottles preferred | |
| Water purification tablets | 1 pack | All seasons | Useful for safe drinking water | |
| Personal Items | Sunscreen | 1 | All seasons | UV exposure increases with altitude |
| Lip balm | 1 | All seasons | Prevents dryness | |
| Sunglasses | 1 | All seasons | Protects from strong sunlight | |
| Basic toiletries | Small kit | All seasons | Pack travel size | |
| Health & Safety | Personal medications | As needed | All seasons | Always carry your own |
| First aid kit | 1 small kit | All seasons | Include pain relief and bandages | |
| Hand sanitizer | 1 | All seasons | Very useful on the trail |
This checklist should already give you a good starting point while packing.
But don’t worry, we’re not stopping here. In the next sections, I’ll explain each category in detail, including:
- which items are absolutely necessary
- which ones are optional but helpful
- and a few things you should avoid carrying altogether
And I’ll also share a few packing mistakes I personally made during my own 5-day Mardi Himal Trek, so you don’t end up repeating them.
What I Carried on My Mardi Himal Trek [in December]
December is a part of the winter season in Nepal, so mornings and nights were definitely very cold, especially around High Camp. But since the trek itself is relatively short, I still tried to keep my packing simple.
Looking back, a few things worked really well. And a few things… well, I could have packed smarter. Here’s exactly what was inside my bag:
Head and Neck Wear
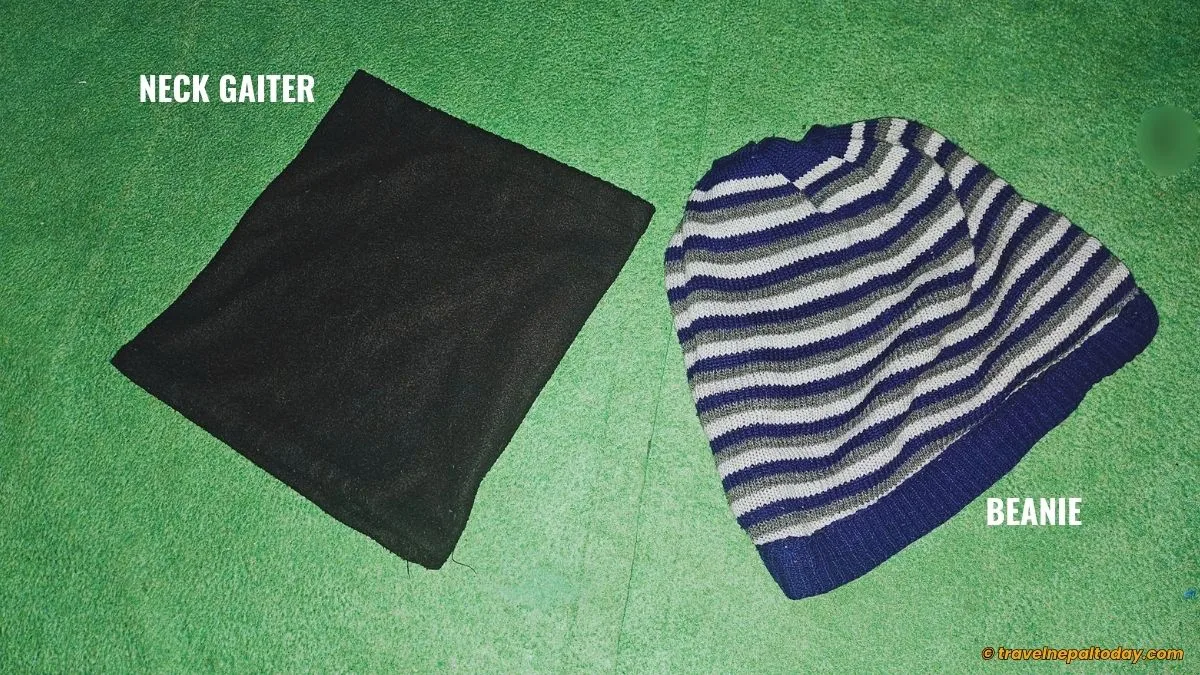
For my head and neck protection, I carried:
- Beanie (without fleece lining)
- Neck gaiter
The beanie honestly wasn’t very warm. Since it didn’t have fleece inside, it struggled to keep my head warm during the colder parts of the trek.
During the early morning hike to the viewpoint, I actually had to combine the beanie and the neck gaiter together just to stay warm. It worked, but a proper fleece-lined beanie would have been a much better choice.
So if you’re trekking in winter, learn from my mistake and carry a warmer beanie.
Eye and Face Wear
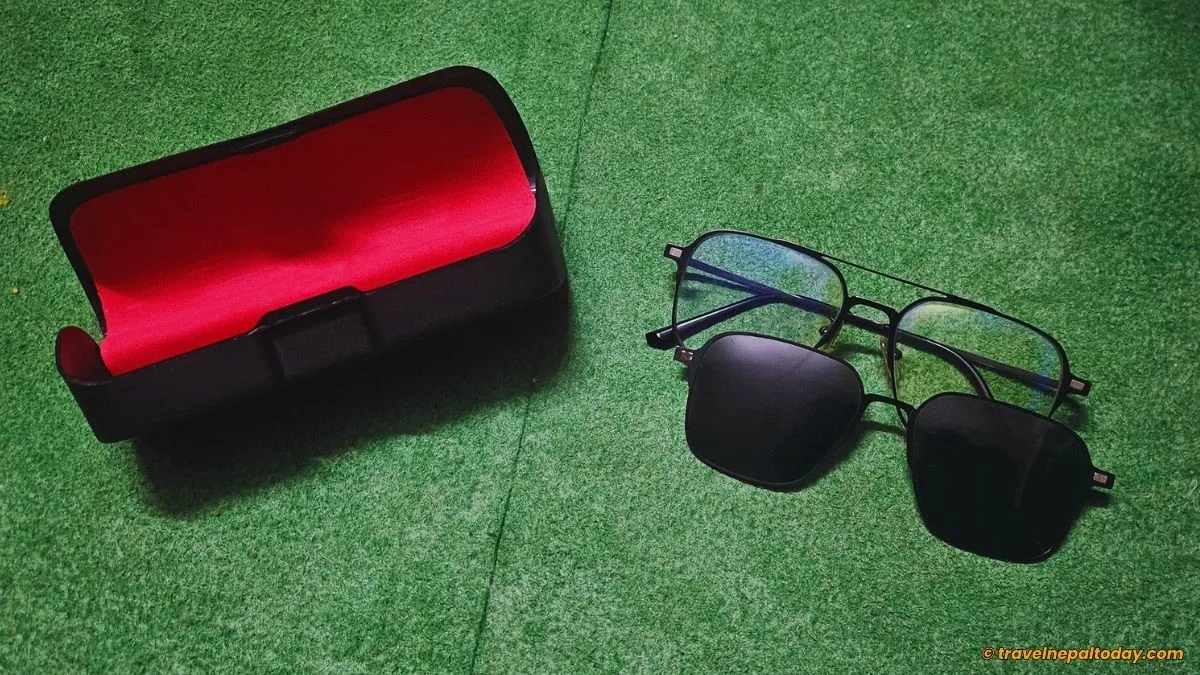
For eye protection, I used clip-on frames with UV protection lenses.
If you wear prescription glasses as I do, this setup works surprisingly well. Instead of carrying separate sunglasses, you can simply attach the clip-on lenses over your normal specs.
It’s simple, lightweight, and honestly very convenient on the trail.
I also carried a few face masks. Not really for the trek itself, but mainly for the drive from Kathmandu to Pokhara. The highway can get dusty, and a mask helps a lot during the long ride.
Upper Body Clothing
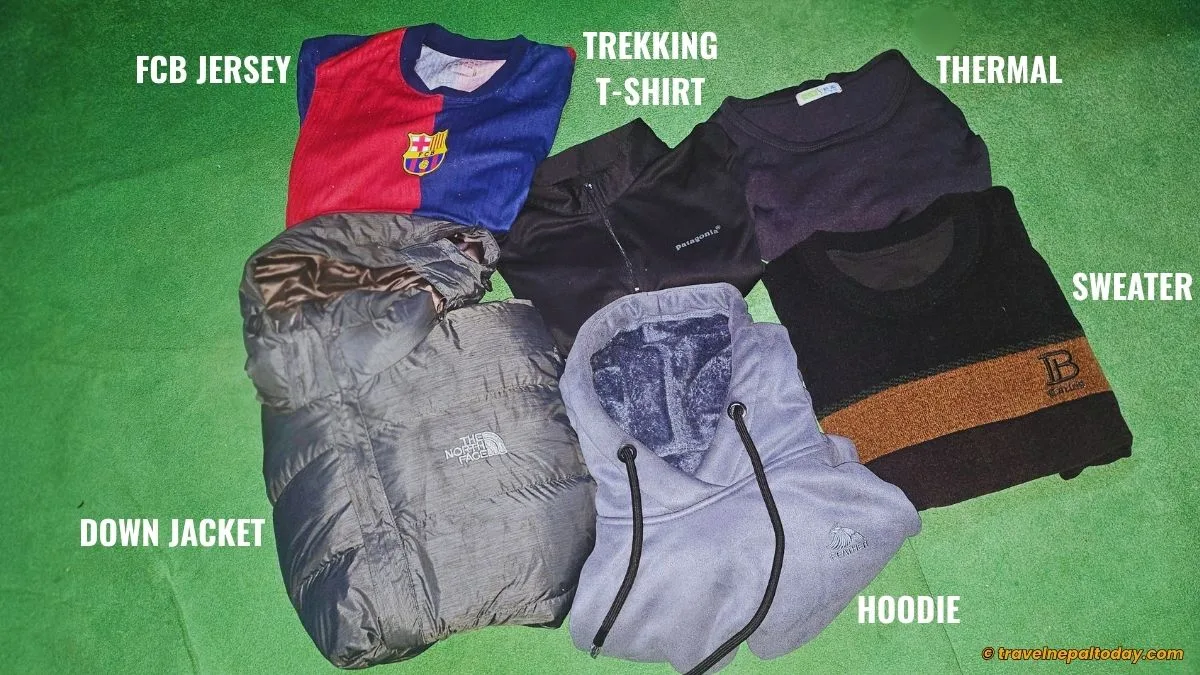
For the upper body, my packing looked like this:
- Trekking shirt (x1)
- Thermal layer (for the night)
- Sweater (for the night)
- Down jacket
- Hoodie with fleece lining (for the night)
- FC Barcelona jersey (that I always carry for pictures; a culer by heart!)
The thermal layer turned out to be very useful (as always). I mainly carried it for sleeping, but I also ended up wearing it during the early morning hike to the viewpoint because it was too cold than expected.
The down jacket was definitely the most important item here. Once the sun goes down in the mountains, temperatures drop quickly.
Lower Body Clothing
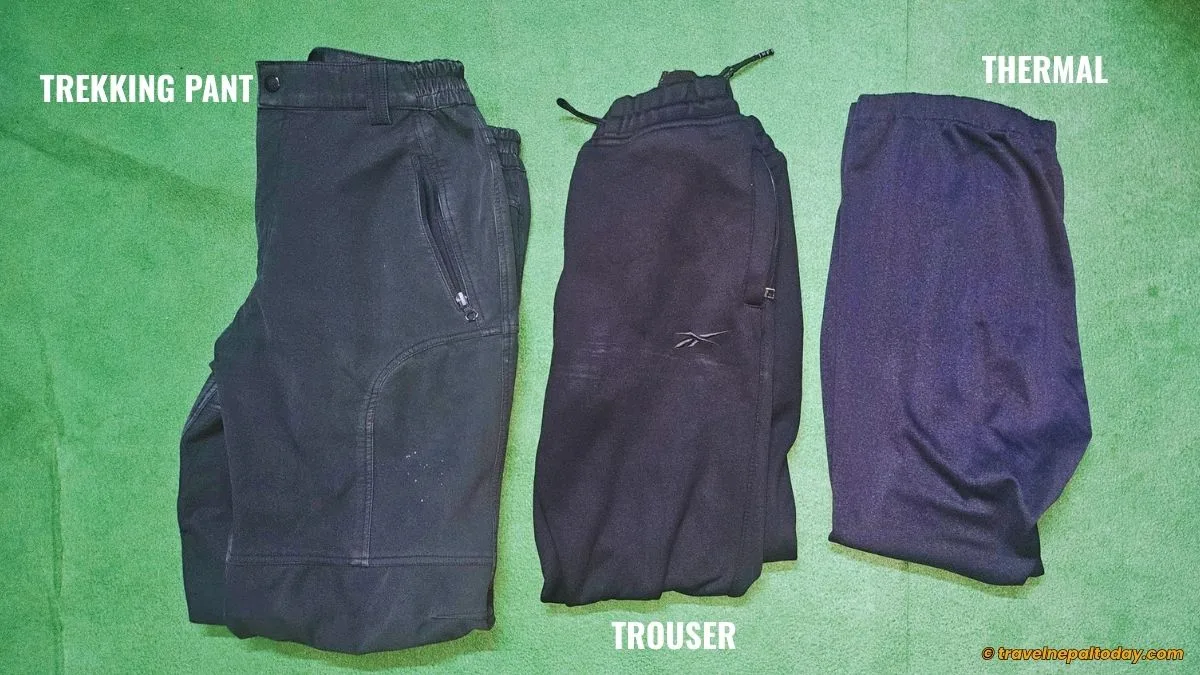
For the lower body, I kept things very simple:
- Trekking pants (x1)
- Trousers for the night (with thermal)
- Undergarments (x5)
Since the trek only lasted a few days, one pair of trekking pants was enough for the daytime hikes. The trousers were mainly for comfort inside the teahouses at night.
Footwear
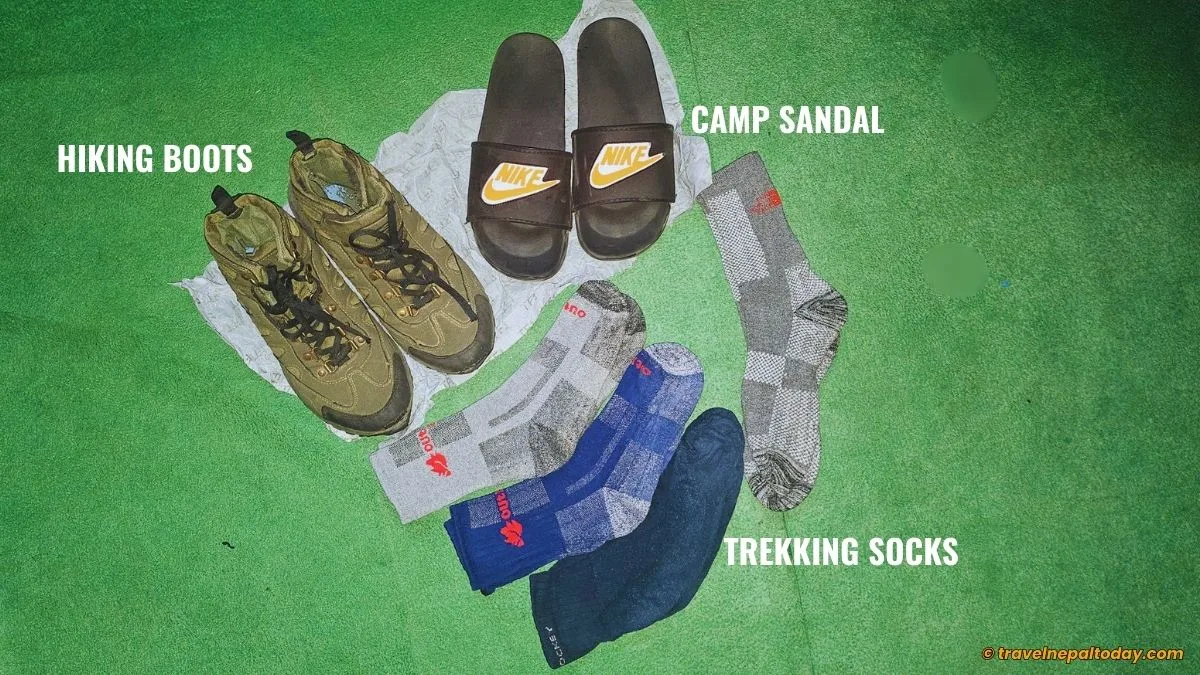
Footwear is one area where you really shouldn’t compromise during a trek. Here’s what I had:
- Trekking socks (x4 pairs)
- Sandals for teahouse stays
- Hiking boots (Goldstar G10, not the best option, honestly)
I used the same pair of socks for two days while trekking. But at High Camp, the temperature dropped enough that I ended up wearing two pairs together at night just to keep my feet warm.
The sandals were honestly a great decision. After walking the whole day in boots, your feet will definitely appreciate something lighter in the evening.
As for the hiking boots, they were just a normal pair of trekking boots. Nothing fancy, but they were comfortable and already broken in, which matters more than anything else.
Trekking Essentials
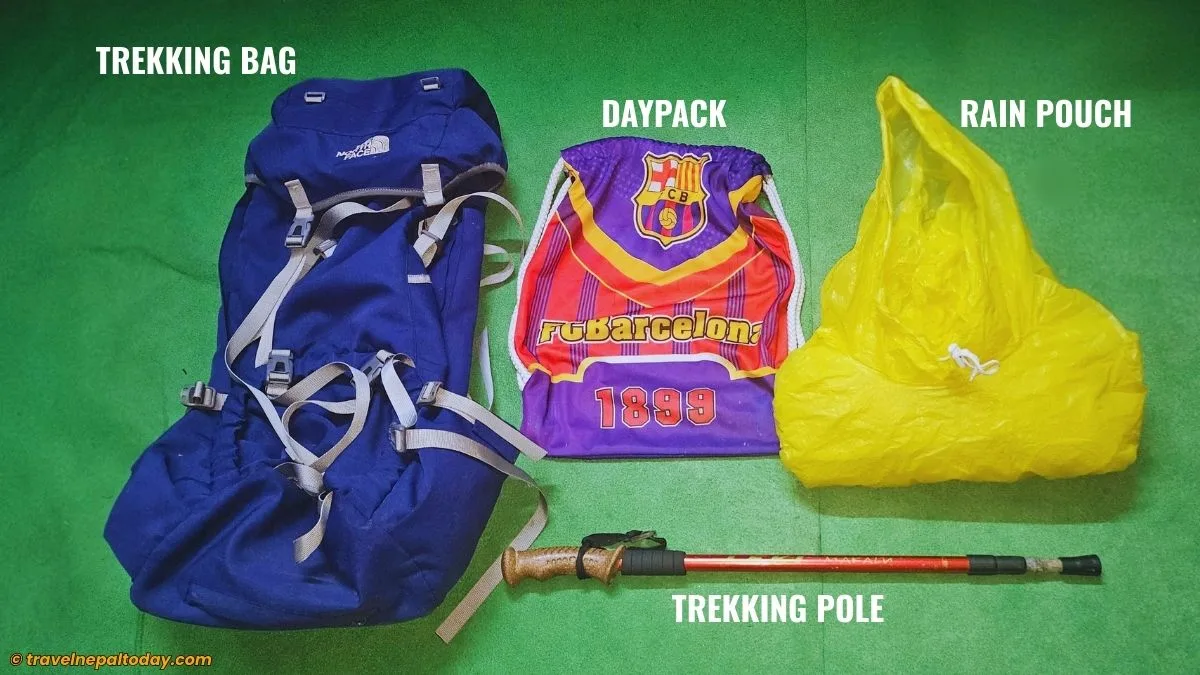
Finally, these were the basic trekking items I carried:
- Trekking pole (one stick)
- 60L trekking backpack
- Raincoat
- Daypack
The trekking pole helped quite a lot on steep sections, especially while descending. Now about the 60-liter backpack… honestly, it was a bit of an overkill for the Mardi Himal Trek. A 40L bag would have been more than enough!
But I already had this bag, and I didn’t want to increase my trekking expenses just to buy another one, so I simply used what I had.
And the raincoat? Well… it stayed inside my bag the entire trek. Completely unused.
But that’s the thing with mountain weather. You never know when rain might appear, so carrying one is still a good idea.
Personal Items
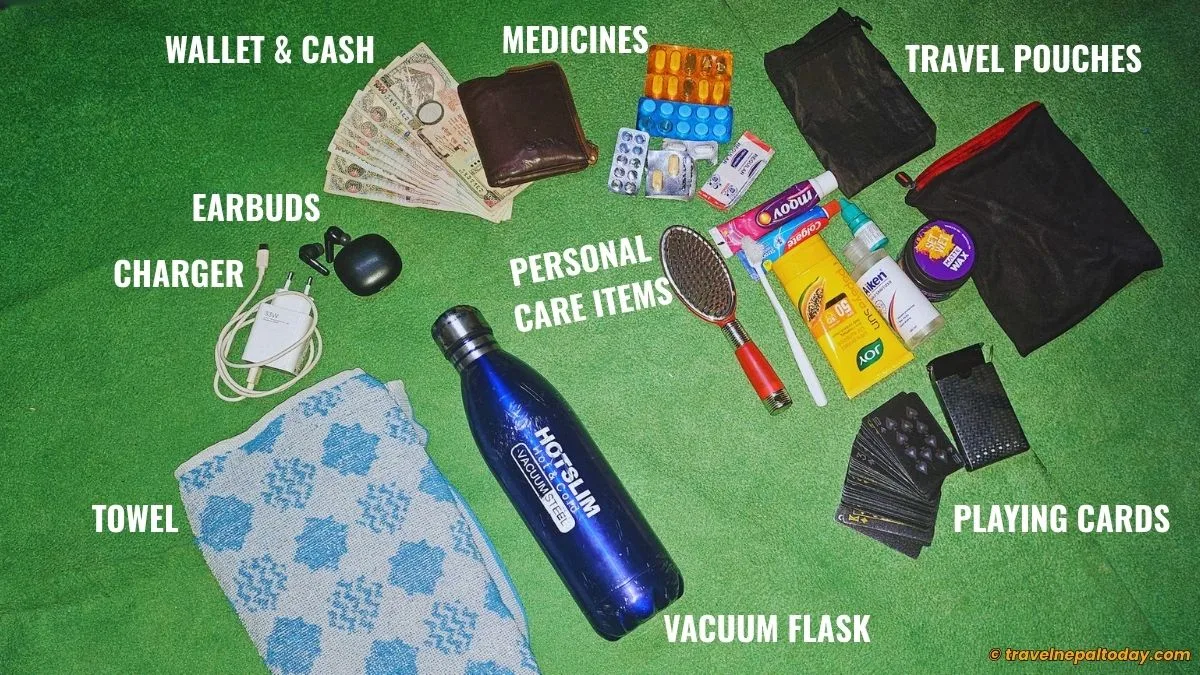
Besides clothes and trekking gear, these are other items I carried:
- Towel (x1)
- Vacuum flask
- Personal care (petroleum jelly, sunscreen, teeth-care, hair brush, face wash, etc.)
- Cards (for night stay games with strangers)
- Most essential meds: Paracetamol, Pantoprazole, Domperidone, Metronidazole, Throat lozenges, Painkillers
- Wound plaster and pain-relief spray
- Tissue and hand sanitizer
- Cash (properly divided in different sections of the bag, pockets, and wallet)
- Gadgets: Z-flip 5 phone (yet to buy a good camera), 10,000 maH power bank (from Ultima), Earbuds (from Ultima), USB-C charger, tripod stand with selfie stick
- Snacks: Chocolate bars (x3), Dry noodles (x3), A packet of biscuits (x1)
I missed carrying a headlight and had to rely on one of my friend’s for the first half and my own phone’s light until dawn (which cost me its battery in that cold).
Mardi Himal Trek Clothing List Based on Season
One thing you should know about the Mardi Himal Trek is that mornings and evenings are almost always cold, no matter the season. The difference is mainly how cold it gets.
In winter, temperatures drop much lower. In spring and autumn, the cold is still there, but a bit more manageable. And during summer or monsoon, the afternoons can actually feel quite warm.
Weather in the mountains isn’t only about temperature though. Things like wind patterns, rainfall, snowfall chances, trail conditions, and even crowd levels can influence how you plan your trek.
Every season has its own advantages and disadvantages, and your clothing choices should reflect that. Let’s go through each season so you know exactly what to pack and what to expect.
Spring (Mid-March to May)
In spring, mornings and evenings are still chilly, but afternoons can sometimes feel warm, especially when the sun is out. The weather is generally stable, though unexpected rain or light snowfall can still happen occasionally.
The good news is that heavy rain or snow is quite rare during this season. Wind conditions are also usually pleasant, which is why many trekkers consider spring one of the best seasons for the Mardi Himal Trek.
Clothing List for Spring:
- Headwear: Beanie or ear-flap hat, Sunhat or cap
- Neckwear: Bandana or buff
- Body wear: Layering becomes very important in spring.
- Inner layer: Undergarments (1 per day), sports bra for women
- Base layer: Trekking shirts (1 or 2 is enough – try to reuse them instead of overpacking)
- Mid-layer: Useful for mornings, evenings, and late afternoon walks. Choose one: fleece jacket, merino wool layer, alpaca sweater, softshell jacket, insulated synthetic or light down jacket
- Outer layer: Usually not required, but you can carry one if you prefer. Choose one: hard shell jacket, windbreaker
- Bottoms: shorts (for warmer afternoons), trekking trousers (for early mornings and the sunrise hike)
- Sleepwear: Thermals (very important for the cold nights), a comfortable pullover and trousers for sleeping
- Handwear: Gloves are highly recommended, especially for the early morning hike to the viewpoint or base camp
- Footwear: Trekking socks (a mix of thin and thick pairs, about one pair per day)
- Optional: Sunglasses (helpful during sunny afternoons, but not absolutely necessary since snow glare is usually minimal)
Summer (Mid-May to July)
Summer in the Mardi region is usually warm, even during mornings and evenings. But nights at higher altitudes, especially around High Camp, can still feel cold.
The main difference you’ll notice is sweat. Afternoon hikes can get warm, and you may feel sweaty during long uphill sections.
Another thing to watch out for is rain. Light showers or even sudden heavy rainfall can happen.
So, rain gear becomes important here! I’d also suggest packing your clothes in zip-lock bags inside your backpack to keep them dry.
Clothing List for Summer:
- Headgear: Sunhat or cap
- Body wear:
- Inner layer: Undergarments (1 per day), Sports bra for women [Tip: Carry one extra set, since sweating can be quite common]
- Base layer: Trekking shirts (2 to 3 as it might be difficult to reuse sweaty shirts)
- Mid-layer / Outer layer: You usually only need one jacket. Choose either a windbreaker or Light down jacket (if you feel cold easily)
- Bottoms: Shorts are usually enough. But if you prefer trousers, that works too!
- Sleepwear: Thermals (useful for cold nights even if it’s summer), Comfortable pullover and trousers
- Handwear: Gloves are still useful for the early morning hike to the viewpoint
- Footwear: Trekking socks (mix of thin and thick pairs, about one pair per day)
- Optional: Sunglasses or buff (helpful for sun protection), Beanie or ear-flap hat for night stays
Monsoon (Mid-July to September)
Monsoon season is similar to summer in terms of temperature, but rain becomes the main challenge. When it rains, the air can suddenly feel colder. And above Badal Danda, temperatures can still remain quite low.
Waterproof packing becomes extremely important here. Always keep your clothes inside zip-lock or dry bags.
Rain gear is absolutely essential during this season. Some trekkers even carry umbrellas. Personally, I find them a bit inconvenient while walking, but you might still find them useful during heavy rain.
Another thing to remember during monsoon is leeches. The forested section from Pitam Deurali to Low Camp (and from here to Sidhing) is likely to have leeches during the rainy season. Carrying a small amount of salt helps remove them easily if they attach to your skin.
Overall, this is not the most recommended season for the Mardi Himal Trek, but if you’re planning it anyway, proper preparation becomes very important.
Clothing List for Monsoon:
- Headgear: Beanie or ear-flap hat for evenings, Sunhat or cap for sunny moments
- Body wear:
- Inner layer: Undergarments (1 per day), Sports bra for women (carry 1 to 2 extra pairs, since wet clothing is common)
- Base layer: Trekking shirts (2 to 3), clothes may get wet more often
- Mid / Outer layer: Waterproof jacket (essential), optional down jacket for colder nights in the teahouse
- Bottoms: Trousers are recommended, Shorts (can work, but leeches might reach your legs)
- Sleepwear: Thermals are still a good idea for High Camp nights, Comfortable pullover and trousers
- Footwear: Trekking socks (mix of thin and thick, carry 1 to 2 extra pairs)
Autumn (October to Mid-November)
Autumn is often considered the best season for views during the Mardi Himal Trek.
The skies are usually clear, and mountain visibility is excellent. The only downside is that it can get quite crowded, since this is the peak trekking season in Nepal.
Because of the crowd, it’s actually a good idea to carry a sleeping bag. Some teahouses may run short of blankets when the trail gets busy.
In terms of clothing, packing is quite similar to spring. Just make sure you bring slightly warmer layers, as temperatures begin to drop slowly after October.
Rain and snowfall chances are relatively low, but mountain weather can never be predicted perfectly. So it’s always wise to check the latest weather forecast before packing items like rain gear or crampons.
Pre-Winter (Late November to December)
This is when the cold slowly starts creeping in. The trail might still see a fair number of trekkers, but temperatures begin dropping noticeably (especially during mornings and nights).
Snowfall becomes possible, which means crampons may sometimes be necessary depending on trail conditions.
Packing is still similar to spring and autumn, but you should focus more on warm sleepwear and proper layering.
Carrying both a mid-layer and an outer layer becomes important during this time.
Winter (January to February)
Winter is when the Mardi Himal region becomes truly cold.
Snowfall becomes more common, and when snow melts during the afternoon and freezes again later, the trail can become slippery. Carrying crampons is therefore a good idea.
Clothing choices should be similar to the pre-winter season, but with extra warmth.
Try to make sure that:
- Jackets have proper insulation.
- Trousers have fleece lining if possible.
- Carrying extra gloves can also make a big difference.
Despite the cold, winter trekking in Mardi Himal can actually be a beautiful experience. Snow-covered trails and clear skies create a completely different atmosphere.
Yes, it’s a bit more challenging. But the difficulty is still manageable with proper preparation.
One small tip from experience: If you rely on water for cleaning, carry wet wipes as well. At High Camp, water stored in drums sometimes freezes during winter mornings, which can make things a little inconvenient.
Packing Your Trekking Equipment (Regardless of Season)
Now that we’ve covered clothing, let’s talk about trekking gear. These are items you should carry no matter what season you plan to trek in.
Quality always matters when it comes to trekking equipment. But since the Mardi Himal Trek is relatively short, mid-range gear can still work fine, especially if you’re buying something for a one-time trip.
That said, I personally recommend investing in good-quality gear if possible. Trekking equipment tends to last for years, and you can easily use it again for other treks in Nepal.
Trekking Bag
For Mardi Himal, you’ll want a 40 to 50L trekking bag (as you read from my experience earlier).
Make sure it has strong straps and a waist belt. You don’t want your shoulders or back screaming by the second day.
Also, consider your back length and shape. Height, weight, and even gender affect how a bag fits, so don’t just grab the first one you see.
Carry a small daypack too. Just enough for your water bottle, snacks, and essentials.
Also, grab a few zip-lock or plastic bags to separate used clothes or wet items. Trust me, they come in handy.
I’ll soon write a full guide on picking the best trekking bag over at Travel Nepal Today, so bookmark this site right away!
Hiking Boots
Don’t make the mistake of bringing light trekking shoes. This is a mountain trek, and the trails get rugged as you go up. You need proper backpacking boots (cushioned, supportive, durable, and stable).
Look for boots that are:
- Waterproof and abrasion-resistant
- Stiff collar for ankle support
- Can handle the weight you carry
- And check if they’re crampon-friendly, just in case you hit snow.
Most importantly, get the right size. Measure your feet and make sure they’re not too tight or too loose. If you have doubts, exchange them, don’t force it! A bad fit can ruin your trek.
Extra tip: Don’t take brand-new boots straight onto the trail. Wear them on a short hike first to break them in.
Don’t forget to carry flip-flops or camp sandals so your feet can breathe in the teahouses.
Trekking Poles (Optional)
Not strictly required, but trust me, they help a lot on steep climbs and descents. I usually carry one stick for moderate treks like Mardi.
Who really needs them? Anyone prone to knee problems, or if you want extra balance while carrying your bag.
Good poles reduce stress on your joints and make uphill hikes a bit less painful.
Crampons
Not essential for most of the year. But if you’re trekking in winter or expecting snow, consider carrying them.
Slippery trails plus boots that aren’t super grippy = a high chance of falling
And trust me, a fall on that trail is no joke!
What Personal Items to Pack for Mardi Trek
Now that we’ve covered the big trekking stuff, let’s talk about the personal items you really need:
First Aid and Medicines
Bring the basics:
- Ibuprofen
- Paracetamol
- Dextromethorphan (dry cough)
- Guaifenesin (wet cough)
- Pantoprazole, Domperidone, Metronidazole
- Throat lozenges
- Painkillers
- Acetazolamide (Diamox) [only if prescribed by a doctor, we’ll have a separate guide on this soon!]
A quick warning: Many trekkers take acetazolamide without consulting a doctor or at least a pharmacist. Don’t do that! Only use it if your physician approves and you have risk factors for altitude sickness. If your doctor clears it, start from day one of the trek so it works properly.
But honestly, the best way to avoid altitude sickness on Mardi Himal is simple: acclimatize properly. The itineraries I’ve shared on Travel Nepal Today (3-day to 8-day options) are all altitude-friendly.
Also, check your overall health with a physician before the trek. This is important, especially if you have chronic heart or lung issues, or if you’re pregnant, because the terrain after Badal Danda can be tough.
Another thing not to miss is a pain relief spray. It’s handy for sore muscles after steep climbs or long days on the trail. Those having issues with knees and ankles can carry knee pads and ankle binders too.
Personal Care and Toiletries
- Towels: One face towel and body towel is enough. Keep it light.
- Soap & Shampoo: Carry soap sheets (super handy) and a small shampoo/body wash. Hot showers are rare, so use them only at lower altitudes (like once you’re in Sidhig or back in Pokhara).
- Tissues & Wet Wipes: Absolutely essential. Trust me, you’ll thank yourself on long days.
- Deodorant: Skip perfumes. Simple, unscented deodorant works best, especially when you’ll likely skip showers for 3 to 4 days.
- Entertainment: Pack a few things to fight boredom, like cards, books, journals, etc.
Gadgets and Electronics
- Power bank: Must-have. Charging is usually shared in dining halls. So, a high-capacity power bank is a lifesaver for the next 4 days to 6 days on the trail.
- Chargers & adapters: Nepal uses 230V AC at 50 Hz, so bring a universal travel adapter.
- Phone, camera, and accessories: If you plan to fly a drone or do filming, you need separate permits. You can register at CAAN here.
- Headlamp: Don’t forget spare batteries (for that early morning hike to Mardi Viewpoint).
- Earphones/headphones: Perfect for the jeep ride to Pitam Deurali or the return to Pokhara.
Snacks and Hydration
For drinking, note that bottled or processed water is available, but expensive.
Since there’s no major natural water source on the Mardi trail, the water you get is often just boiled, not filtered. In fact, at high altitudes, they even melt snow and boil it. Definitely not the safest option!
So, bringing purification tablets or drops is always the best option. And if you can’t, make sure to drink boiled water only.
Regarding snacks, light and high-energy ones are gold. These include:
- Dry noodles
- Chocolate bars
- Protein bars
- Energy drinks
- Instant tea/coffee
- Dried fruits, nuts, electrolytes
These keep your energy up and are a lifesaver as teahouses in Mardi trail offer limited options when it comes to snacks.
Your Permits and Documents
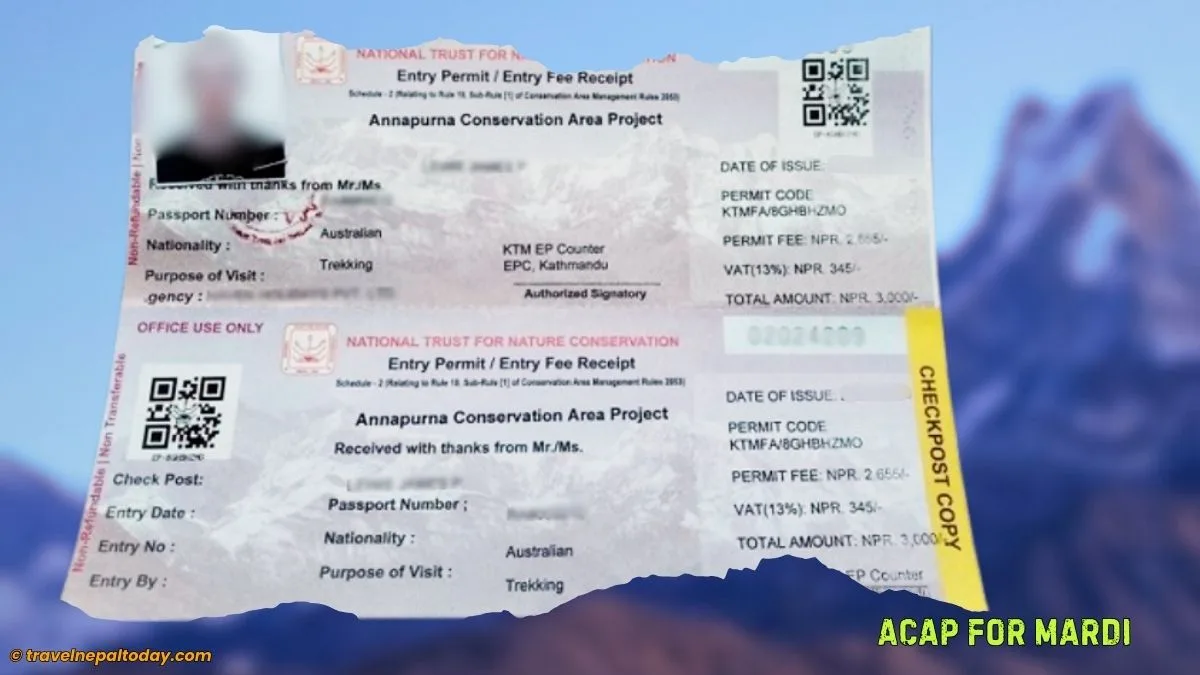
The only one Mardi Himal permit your require is the ACAP (Annapurna Conservation Area Permit) as it falls in the Annapurna region. If you’re booking with a trekking agency, they usually handle it.
But those who are trekking independently or going with a local guide, make sure you’re carrying it yourself.
You might have heard of the TIMS Card, but it’s optional. So, if you’re really concerned about safety, I still suggest getting it.
Other documents that you need to carry are:
- Passport with Nepal visa (and a few copies)
- Passport-size photographs for applying ACAP
- Travel Insurance is highly recommended, which should cover emergency helicopter evacuation, trip cancellation due to bad weather, and altitude sickness treatment (above 4,000 meters)
- A trekking map is always handy (but optional)
- Enough Nepali cash, as remote areas rarely accept cards or online payment
For Nepalese trekkers, you won’t have to worry about these things at all. Just Nepali cash and a map if you want to. Insurance is subjective, but considering how we all are travelling so much these days, we might need to think about this too? (including myself!)
What Not to Carry for Mardi Himal Trek
Sure, you’ve got the idea of what to bring and what not to. But honestly, you won’t generally require the following items (unless absolutely necessary):
- Duffel bags: They’re heavy and inconvenient.
- Sleeping bags: Not essential except during peak season. Still, a sleeping liner would do.
- Crampons: Only needed if snow is expected.
- Ice axes and ropes: This trek is simple. (Full summit to Mardi Himal is a different story, which surely require these technical equipment!)
- Excessive cotton clothing: Carry light layers. One tip: leave unused items in small bags along the trail and pick them up on the way back.
- Unnecessary luxury items: Skip them.
- Extra shoes: One pair of hiking boots is enough.
- Too many snacks: Bring just enough; buy extras at teahouses. It supports the locals.
- Credit or debit cards: Most remote spots are cash-only.
Pro tip: You can leave some non-essential items at your Pokhara hotel if you don’t need them on the trek.
Final Thoughts
Hope this guide gave you a clear idea of what to carry and what not to carry for the Mardi Himal Trek!
You can hire porters, especially if arranged through trekking agencies, but I personally suggest carrying your own bag. It adds to the adventure and gives you the real experience of high-altitude backpacking.
I’ll soon publish a helpful post on how to pack your bag properly so you don’t have to worry about weight and pressure. It’s all about technique, strap management, and smart organization!
If you do want to hire a porter, they usually cost around USD 20 to 25 per day. Just fill out this form, and I can help you arrange one. But that will surely increase your overall budget for Mardi trek.
Or you may even ask your trekking agency to include a porter who is legally allowed to carry 20 to 22 kg (about two people’s bags). Still, make sure to carry a daypack for your most essential items (water, snacks, camera, and warm layers).
That was all you needed to hear from me. Have any questions? Comment below, and I’ll surely help you out.
Happy travelling to Kaski!